OKRs: the essence of what we do, building metrics, achieving outcomes.
What are the foundational steps of building good OKRs?
Prerequisite: psychological safety and a real vision: where are we going? Understanding where you are as an organisation helps. The organisation needs to be comfortable with metrics.
The reason we are doing OKRs is alignment: we want to work towards the same goal and everyone needs to have the same expectations.
Questions
How does the organisation needs to evolve to move to OKRs?
What does the organisation want to achieve with OKRs?
Do we want to deploy OKRs on team, organisation, or company level?
What is the outcome (goal) we want to achieve? (moving from output to outcome)
Ask the why: really understand what is going on. If this idea works, which numbers will move? Then widen the solution space on the moving numbers.
You can set OKRs to start measuring outcomes.
What does success look like?
What lever are you using for prioritisation? How do you chose the objective with the highest impact?
Who do you involve in crafting OKRs?
Objectives
Use SMART: Specific, Measurable, Actionable, Relevance, Time-bound. Focus on outcomes over outputs. Focus on positive change.
If you’re spending less than 50% of your time on achieving the objectives then you should ask what the goal of using OKR is? If you didn’t work on the objective, it might not be the most important objective to achieve. Does the priority fit?
Key results
Here is what I want to do to achieve this objective.
Then, the next problem appeared: systemctl didn’t recognise that the service was actually running: it was stuck in the state “activating”. Then I found an article on serverfault that described my problem.
I’m running InfluxDB on Debian so couldn’t apply the suggestion solution, but needed to interpret this a bit. I edited the file:
/etc/systemd/system/influxd.service
I changed the type to simple, as indicated in this code sample:
[Unit]
Description=InfluxDB is an open-source, distributed, time series database
Documentation=https://docs.influxdata.com/influxdb/
After=network-online.target

[Service]
User=influxdb
Group=influxdb
LimitNOFILE=65536
EnvironmentFile=-/etc/default/influxdb
ExecStart=/usr/lib/influxdb/scripts/influxd-systemd-start.sh
KillMode=control-group
Restart=on-failure
Type=simple
PIDFile=/var/lib/influxdb/influxd.pid

[Install]
WantedBy=multi-user.target
Alias=influxd.service
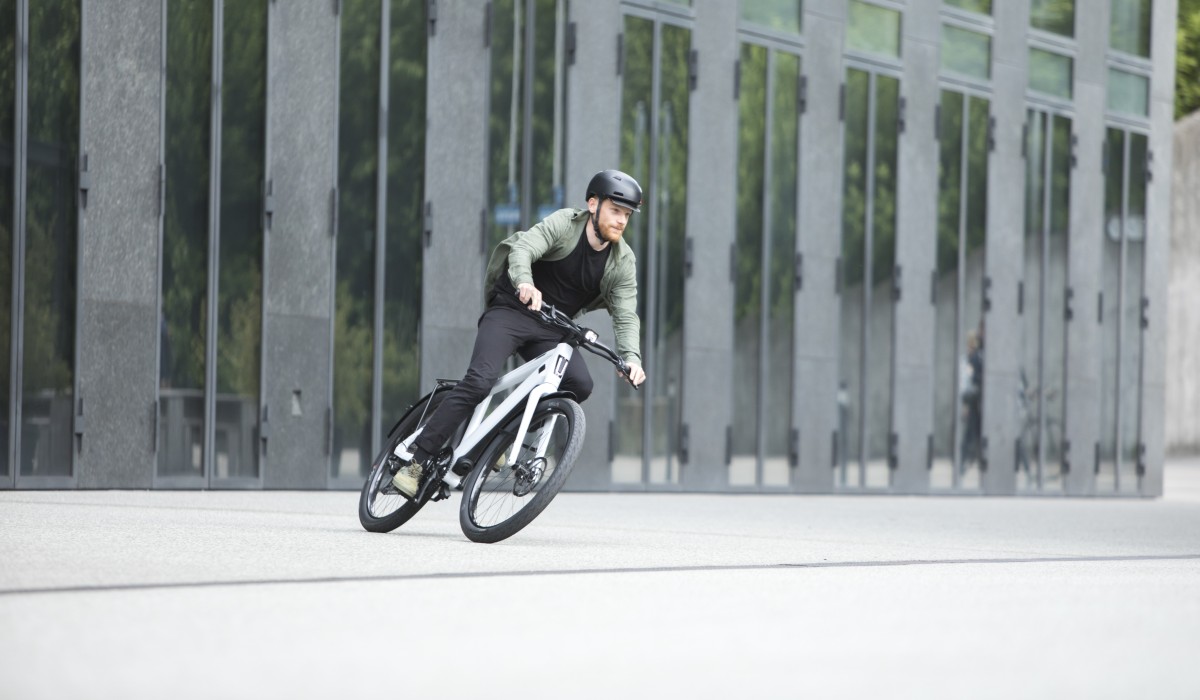
The QWIC Performance RD 11 speed is not just a normal e-bike. It’s a real monster! Push it and it tops out at ~45km/h (~28mph).
Why?
The distance between my home and work is, by bike, roughly 25km. By car, it takes me 25 minutes to get to the office. When I get back from work, I go running or work out a bit. Effectively, I’m spending 25 minutes to get to the office, 25 minutes to get back, and an additional 45 minutes or so to work out and de-stress from work. I was already looking at these bikes (speed pedelecs) for a while and knew their capabilities. Let’s take the mathematical approach: 25km with an average of, let’s say, 40km/h, would take me 37 minutes. Let’s round that up to 45 minutes. A round trip would cost me 90 minutes, roughly the same as my round trip with the car and de-stress session afterwards. This seems to be the perfect opportunity to reduce my impact on the climateand keep moving without spending additional time.
Options
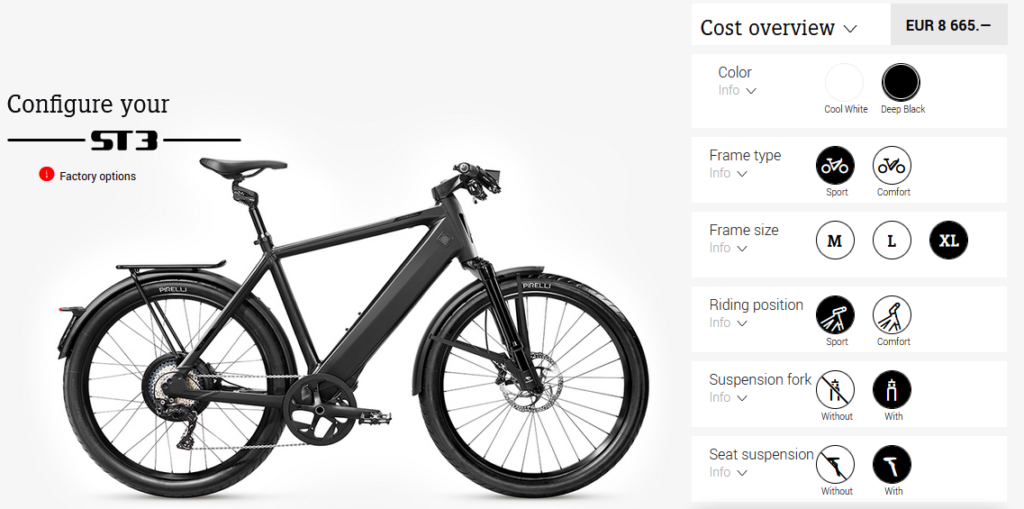
Stromer ST3
Let’s have a look at the options in the market. Stromer is the Mercedes Benz of the speed pedelecs. My first test drive on a speed pedelec was on a Stomer ST3.
That first experience: WOW! This thing is crazy fast… But then I started looking at prices. The Stromer ST3 starts at ~7000 EUR and, including the large battery pack, seat suspension, and suspension fork, goes up to 8665 EUR. This does not include insurance or other accessories, for example, a helmet or glasses. That was a bit more than I was hoping for.
MA11 Speed (Mid-engined, belt-drive, hub gear), starting at 4899 EUR
MD11 Speed (Mid-engined, chain-drive, derailleur gear), starting at 4399 EUR
RD11 Speed (Rear-engined, chain-drive, derailleur gear), starting at 3399 EUR
My first test-drive was on an MA11. Compared to the Stromer ST3 it was a bit of a disappointment: it wasn’t as snappy and I struggled reaching 45km/h. Doing a bit of background research this seems to be a known “issue” with mid-engined speed pedelecs: they do not feel as powerful as their rear-engined counter parts. Looking back, this could’ve also been related to a combination of the bike configuration and the cold windy weather at the day I made this test-drive. I recommend you to experience the difference between a mid-engined and rear-engined bike yourself.
Unfortunately, I couldn’t find a local dealer that an RD11 on stock for a test-drive. I figured out that QWIC build a showroom near Amsterdam. I reached out to them and I made an appointment to try the RD11.
This experience felt totally different compared to the MA11: it felt like the Stromer! I only managed to reach 27km in roughly one hour, which was not really impressive. However, the battery wasn’t fully charged and I experienced a very strong head-wind. All things considered, this was a very positive experience! Now I just had to find a local dealer.
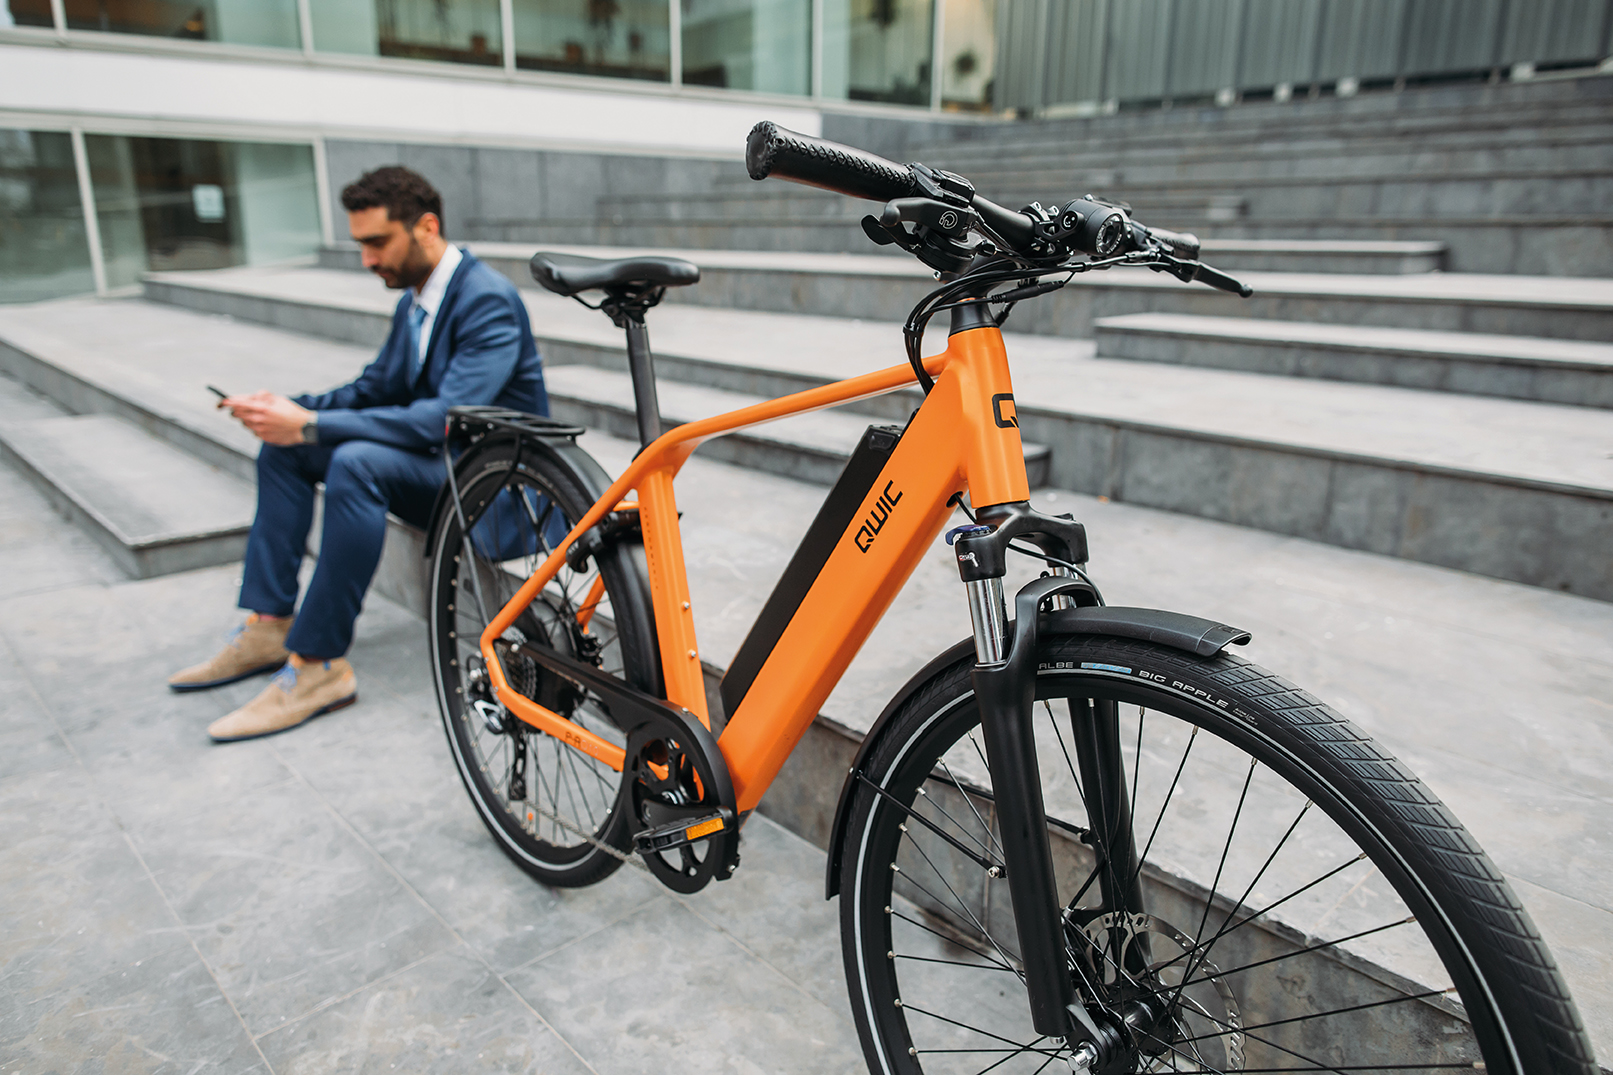
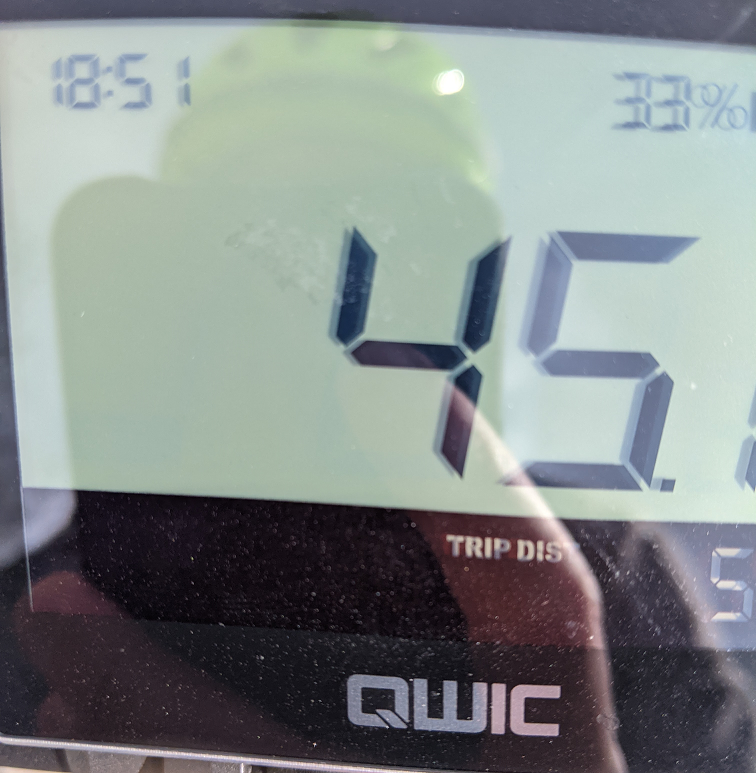
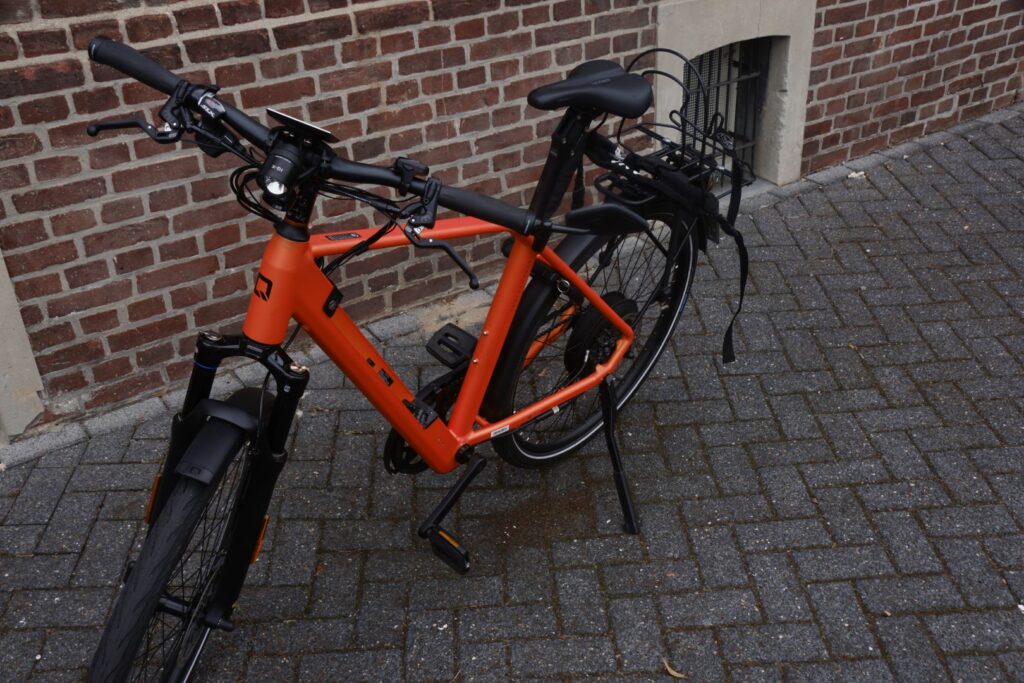
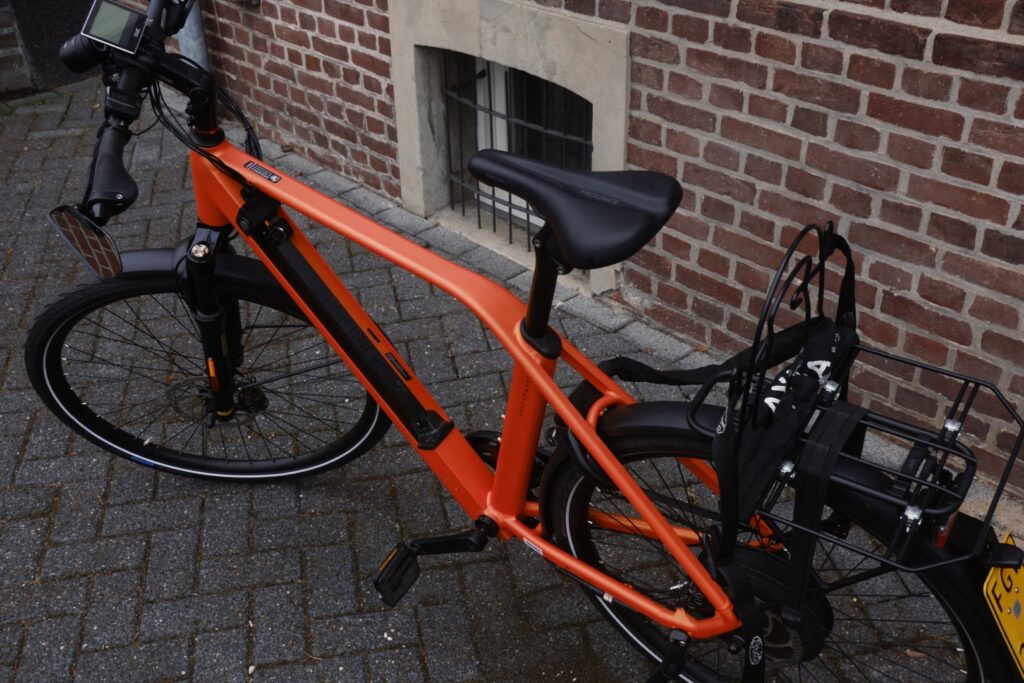
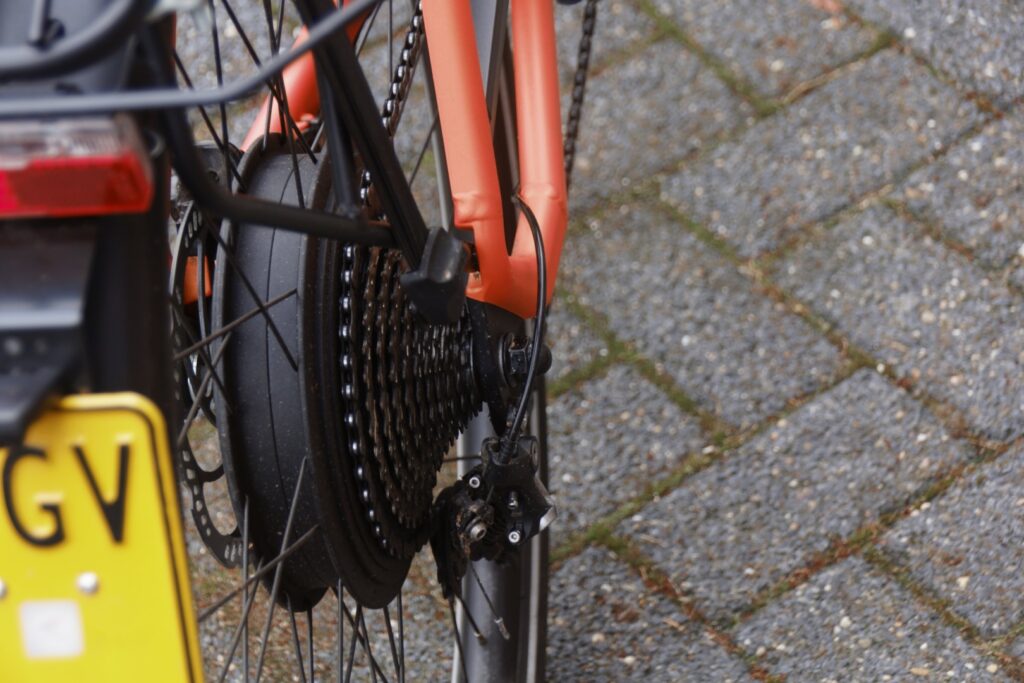
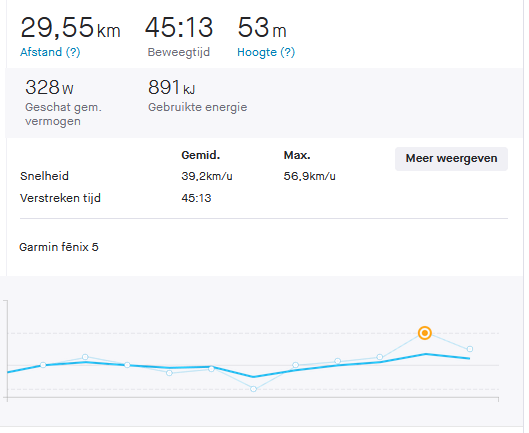
My test-drive of the RD11, captured with Strava.45km/h was easily possible with the RD11!The RD11 in Dutch orange.
Next step: finding a dealer. I asked a couple of dealers to make an offer and decided to have a chat with Fietsenmaker Venlo. The prices where, more or less, the same.
After some discussions I returned home with a really positive feeling. The owner seemed to have a lot of experience with QWIC e-bikes. Even though this would be the first speed-pedelec he would sell, I was confident this was the right dealer. In the end we agreed on a full package price, including helmet, glasses, security lock, 735wh battery, display, and additional charger (so I can leave one charger behind at the office). Total price: ~4500 EUR. On top, I selected an ENRA speed-pedelec insurance (link refers to Dutch website) that would set me back roughly 200 EUR/year.
Daily use
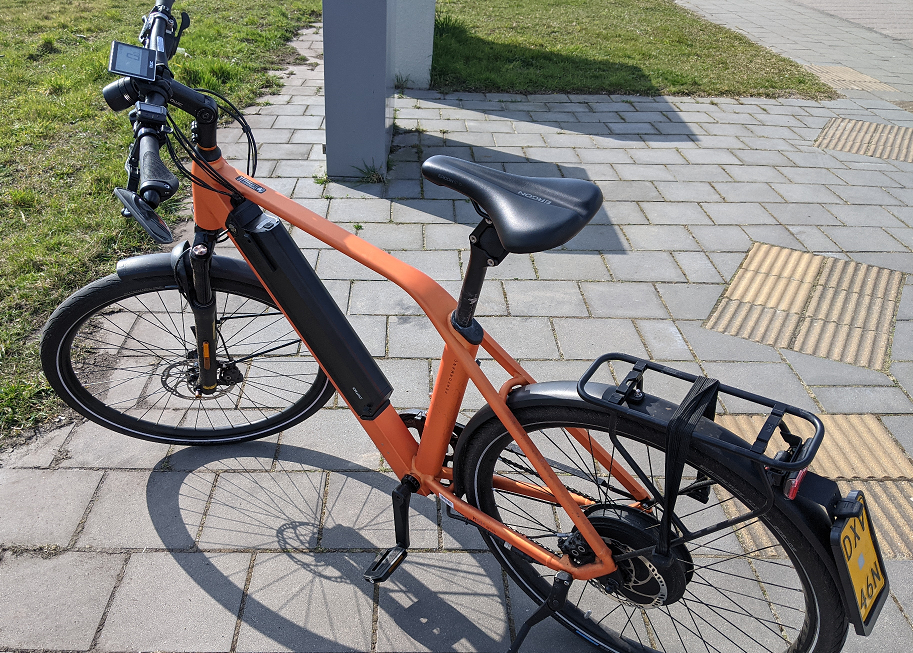
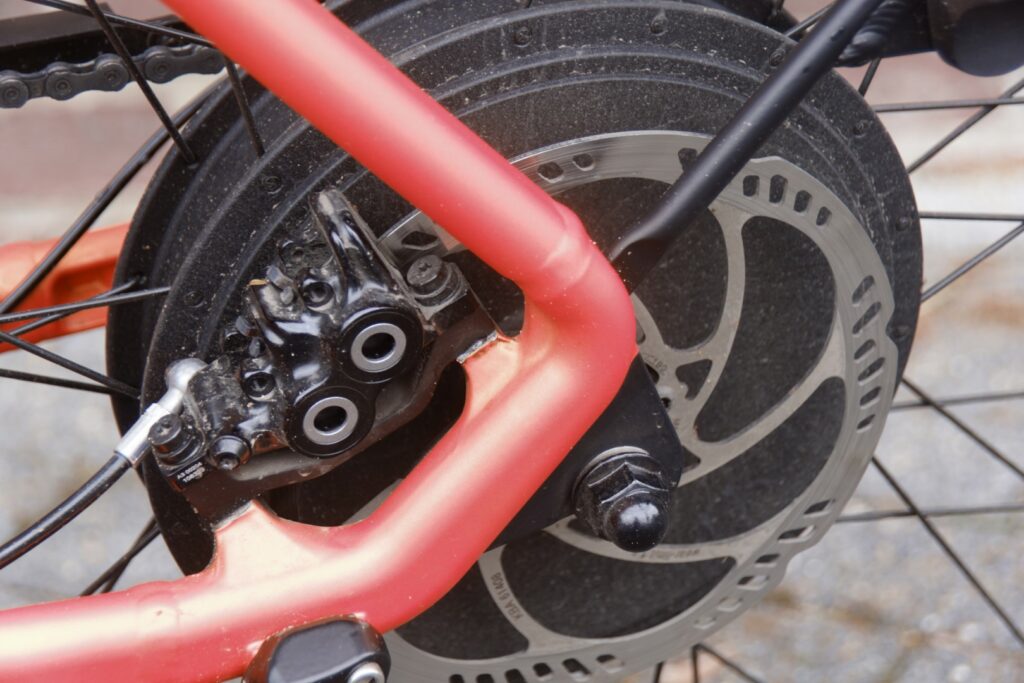
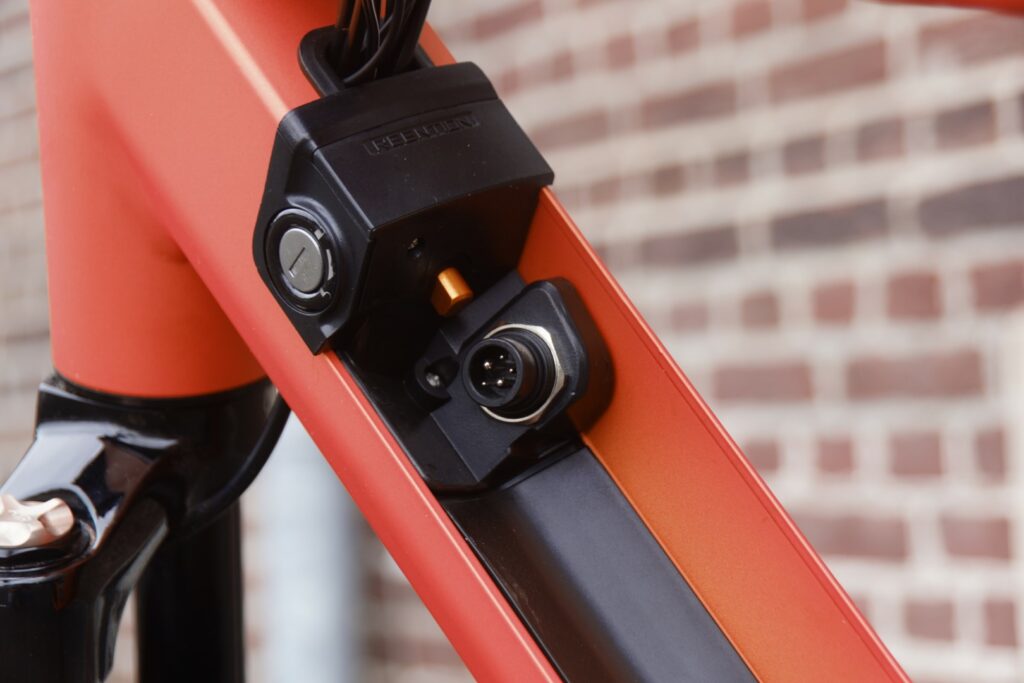
I own the bike now for almost six full weeks, and I really enjoy the daily ride! In the first weeks it was making some squeaky noises, but a quick check-up at the dealer solved those problems. This seemed to be normal after using it for roughly 500km. The gallery below shows some pictures of the bike after using it for 800km and some rain. The orange colour looks really cool in my opinion!
It takes me roughly 45 minutes to travel 27-30km, depending on the wind speed. An average of 37km/h is doable. My record is 30km at 45:13 with an average speed of 39.2km/h and a top speed of 56.9km/h (which I’m not sure is correct).
Strava statistics of the fastest drive.
The battery performs as expected: on an average drive (one way) it consumes between 60-70% of its capacity. This gives me some room for the colder autumn and winter, and some degradation over the next couple of years. This is something I should keep an eye on over the next couple months.
Today, one of my virtual systems ran out of disk space. To find the root cause I needed to find the directory that was filling up. Using the right parameters, the du command returns a list of directories and their disk space consumption.
We always have more ideas, but never seem to have the resources to execute them. Therefore, it is important (both in private and professional life) to carefully cherry-pick a couple of ideas and go all-in. However, keep in mind: it’s never wrong to pivot.
What are we prioritising?
Depending on the industry you’re in you might be prioritising different things. In my work I prioritise a software backlog, but in my private live I (consciously) prioritise in the way I’m building my house or (unconsciously) the things that intrigue me most. In all of these situations we should ask ourselves: what is the goal that I want to achieve? Without having a clear (and preferably measurable) goal in mind, you cannot prioritise.
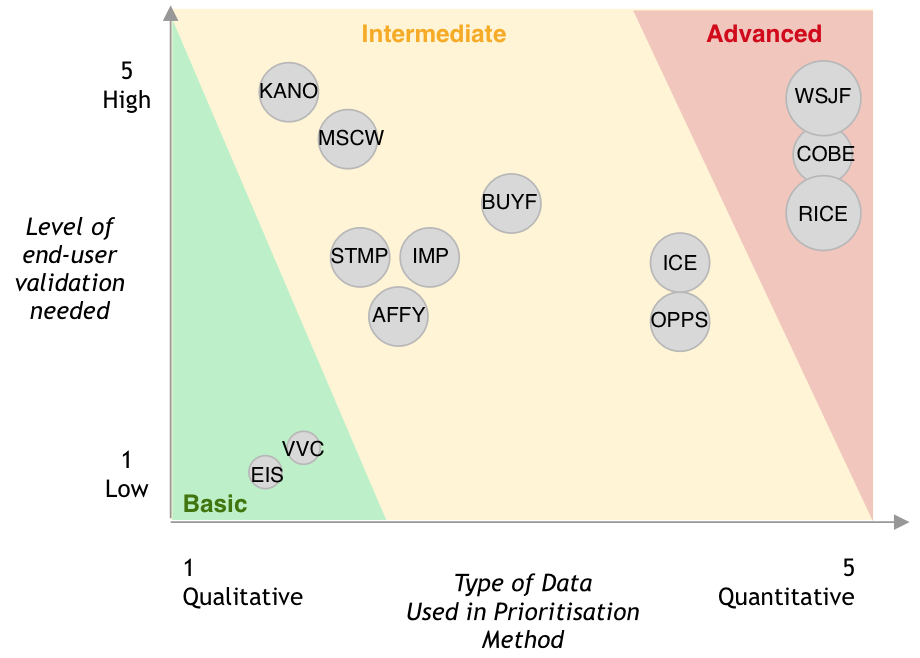
After you’ve defined your goals and what you want to prioritise, you should understand the available frameworks. Note that I didn’t write you should select a framework. I don’t believe there is a one-size-fits-all approach to this. Selecting the right model depends on your personality, way of working, and the context you are prioritising. The UX Collective wrote an article that lists the available prioritisation frameworks and explains the different categories.
Let me introduce you to two of these frameworks: KANO and RICE. This combination works well for me personally. They are pragmatic, easy to explain, and easy to implement.
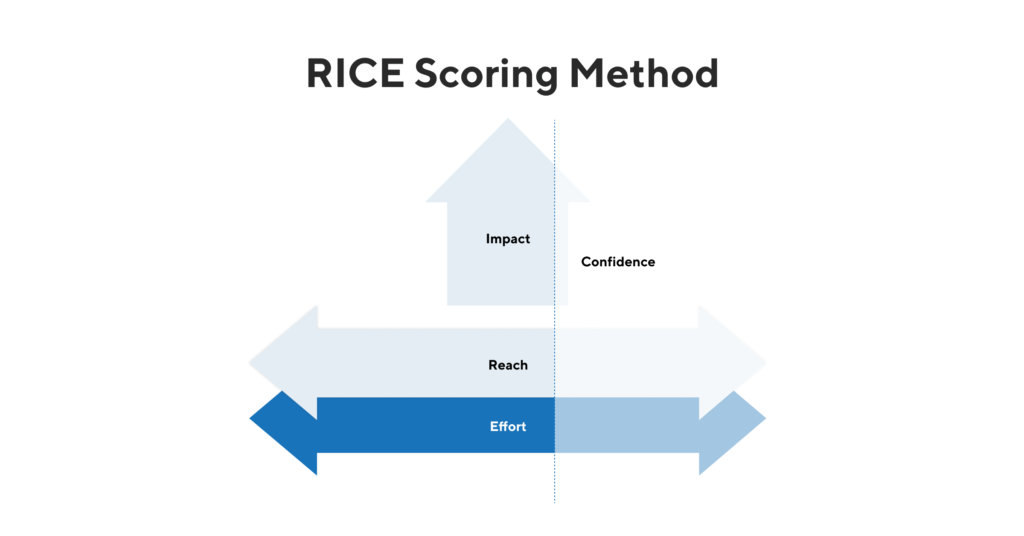
RICE
RICE was developed by Intercom and is an abbreviation for:
Reach: how many of my users will find this thing useful?
Impact: how much impact will this thing have on the metrics we have defined that allow us to reach our vision?
Confidence: how confident are we on our estimations for reach, impact, and effort?
Effort: how much do we need to invest to get the thing in a state that users will start using it?
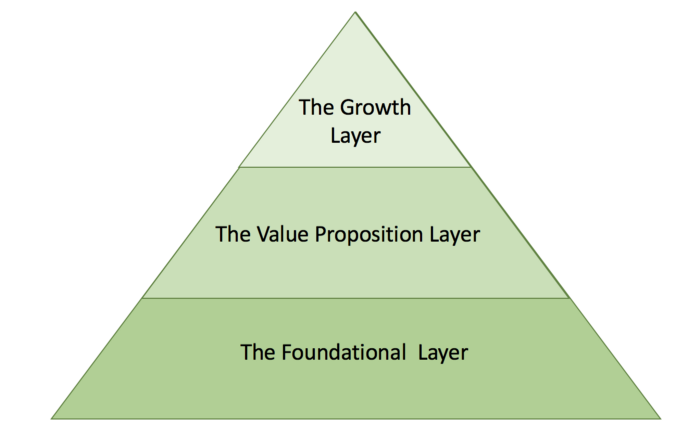
The foundational layer includes functionality that users are not able to live without.
The value proposition layer makes a user successful or it solves a pain.
The growth layer really excited a user by solving a problem that the user wasn’t even aware of. This should set you apart from other solutions as well.
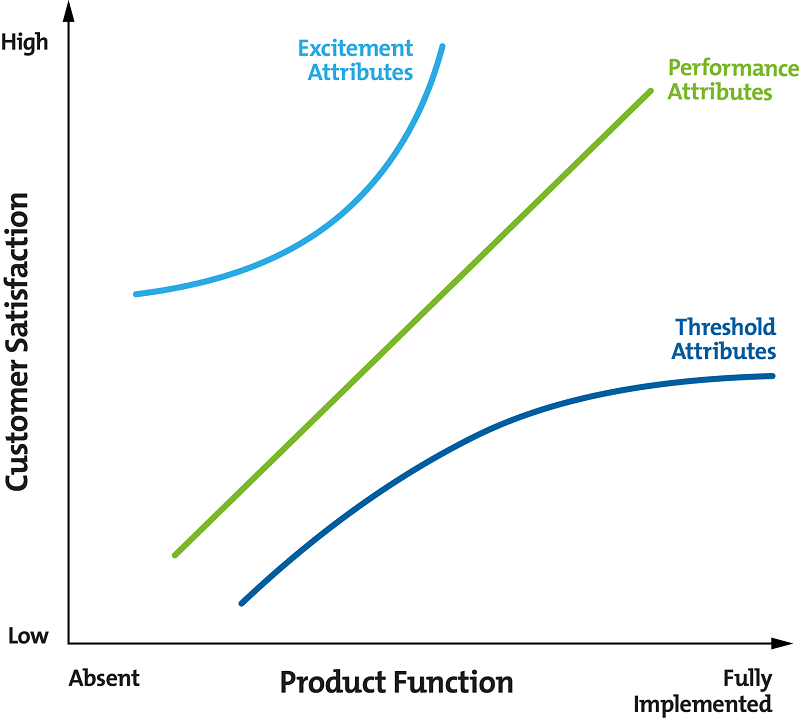
The KANO model uses a similar approach: it’s goal is find a balance between things that users are disappointed on if they are missing (threshold attributes) and things that excite users (excitement attributes). When excitement attributes mature their implementation depth grows and they slowly move right, into the performance attributes.
RICE results in a number. You can easily capture this in a spreadsheet and sort using the highest number. KANO results in a classification. You can easily create a simple spreadsheet to capture the things you want to prioritise. Assign the value and you get an idea of what should be important to you.
Example of the implementation of the RICE and KANO model in a simple spreadsheet.
I recommend that you always interpret the output of the models. Ensure the theoretical prioritisation makes sense in practise.
Implementation and validation
These models require a bit of time to understand and apply. I would suggest to implement them in two steps:
Use them based on experience and a couple of explicit assumptions. This immediately gives you an idea of where you stand.
Once you got the hang of it and found a good way of working, start to validate the assumptions and experience with the users of the thing you are creating. This probably lengthens the prioritisation process. You need to decide if this time is worth it.
Transparency
Taking the time to explain how you came to a decision is just as important as communicating the decision itself. Both RICE and KANO allow you to visually explain how you prioritised the items you are going to work on.
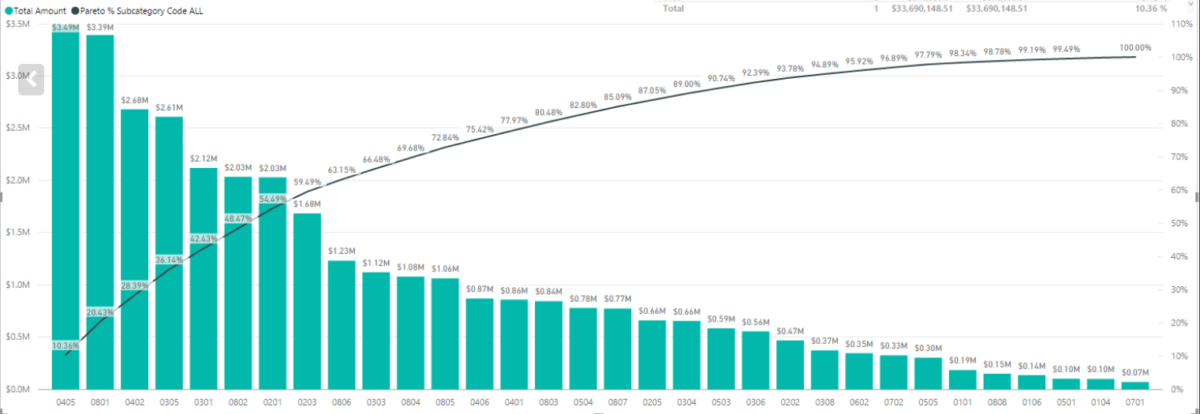
Product Managers love data. Therefore, being able to create your own reports to track the KPIs relevant for your products is really useful. One of the KPIs you might run into relates to the Pareto principle, for example, 80% of the revenue needs to come from 20% of the customer base.
The Pareto principle
I’m going to refer you to the wikipedia for the extensive explanation. I will give you a couple of examples:
20% of the customers should account for 80% of the revenue.
20% of the richest persons in earth account for 80% of the income.
20% of Italy’s population owned 80% of its land.
The Pareto principle in Power BI
We take a couple of steps to get this visualised in Power BI:
Prepare the data structure.
Adding a rank to the data based on a specific category.
As an example I’m using the KPI that 80% of revenue should come from 20% of the customers.
Data preparations
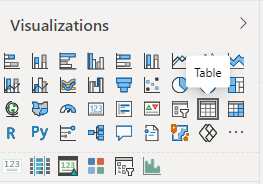
I recommend you to create a table to put the data you want to visualise on the screen. This makes it easy to validate the results of the measures you create.
Adding a table to a Power BI report.
You need two types of data to visualise the Pareto principle in Power BI:
Category: this can be, for example, a customer or country.
A number: this can be, for example, the sales of a customer or country.
Ranking your customers
You first need to find the top 20% of your customers. You should create a measure that calculates the rank of the customer depending on the sales value.
When you add the Rank measure to your table and sort it by sales value, the customer with the highest amount of sales should have rank 1.
Cumulative sales
Now that we have ranked your customers, we want to calculate the cumulative sales. This measure cumulative sales of the customer with rank 1 is the sum of the sales of customer 1. The cumulative sales of customer 2 is the sum of the sales of customer 1 and customer 2.
(use SHIFT+ENTER to create a new line in DAX).
Cumulative_Sales_Value =
var currentRank = [Rank]

RETURN SUMX(FILTER(ALL(Sales[Customer]),[Rank]<=currentRank), CALCULATE(SUM(Sales[Sales_Value])))
Total sales
To calculate the stake of the cumulative sales of a customer in the entire revenue you need to calculate the total sales value. The ALL function applies the selected filters.
The last measure you need to create calculates the cumulative sales (in % of total sales). You will use this measure to create the line in the visualisation of the Pareto principle.
Getting the source code of my home automation project on Github was a first step. Now, I’m ready to post some components on NuGet as well. This makes it easier to manage the packages and reduces the dependencies between my Visual Studio projects.
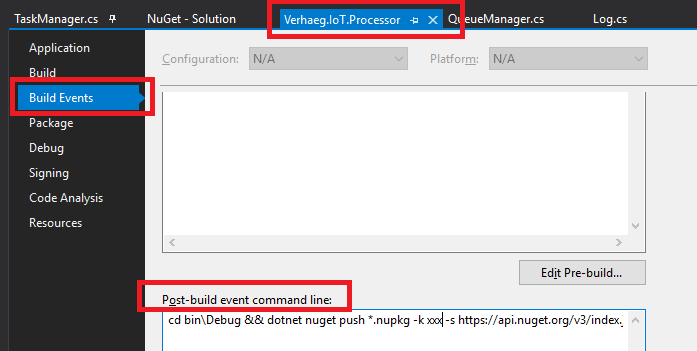
I ran into a challenge though: how could I easily upload my projects to NuGet without having to use the command line? Luckily, Visual Studio has something called Post-build event command line.
Post-build event command line; you can find this in the properties / build events tab of your project.
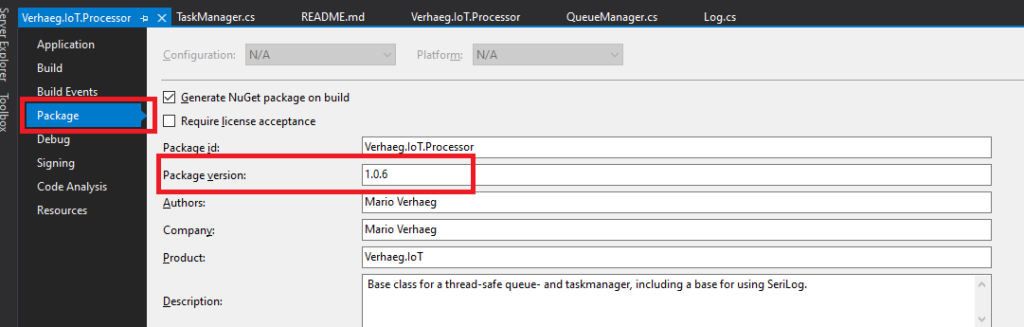
The command put into this block is executed after finishing the build. The only thing you need to do manually is change the package version, otherwise NuGet will rightfully decline the push (the version already exists).
You need to manually update the package version for NuGet to accept the push.
Depending on your directory and project structure you should be able to get the command below up and running. You can easily test this in the Command Prompt, just make sure you browse to the right target directory.
Windows 10 can be quite hungry when it comes to disk space, especially when the system has been used for several years and has been updated several times. In some situations temporary update files are “stuck” in the C:\Windows\WinSXS directory, which at that time can consume up to 17Gb of disk space. Microsoft has published an article describing the process to clean up this directory in more detail. However, this doesn’t always work as described.
I recommend you to do the following:
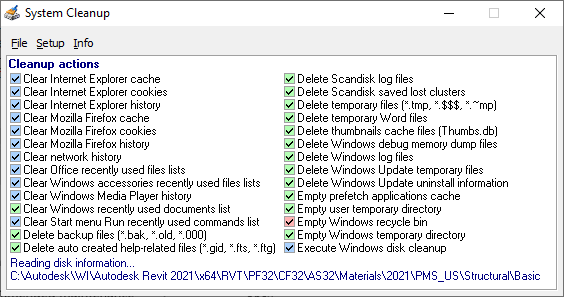
Download the latest version of System Cleanup, an old but ad-free program that scans the system for temporary files.
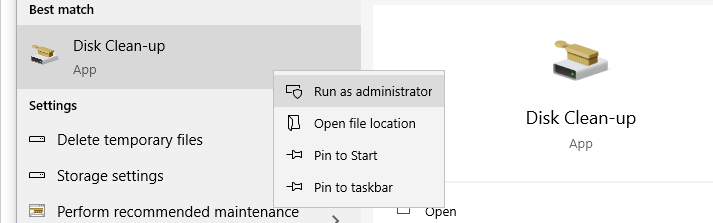
Run the Disk Clean-up (as administrator!) and clean-up the system.
Use Dism, the command line deployment tool, the merge existing update images into the current installation using the commands below. This might take several hours to complete. You might need to repeat them once or twice to take effect.
Running System Cleanup, an old but ad-free tool that scans the system for temporary files.Starting Disk Clean-up as administrator. Make sure you tick all necessary boxes for clean up.
These steps helps helped me to free up roughly 12Gb of storage space on a small little tables that only had a 32Gb drive. Its users can now enjoy using it again for the occasional e-mail and card game, without worrying about a lack of disk space and, as a result, missing important security updates.
Manage Cookie Consent
I use cookies to optimise my website and service.
Functional Always active
The technical storage or access is strictly necessary for the legitimate purpose of enabling the use of a specific service explicitly requested by the subscriber or user, or for the sole purpose of carrying out the transmission of a communication over an electronic communications network.
Preferences
The technical storage or access is necessary for the legitimate purpose of storing preferences that are not requested by the subscriber or user.
Statistics
The technical storage or access that is used exclusively for statistical purposes.The technical storage or access that is used exclusively for anonymous statistical purposes. Without a subpoena, voluntary compliance on the part of your Internet Service Provider, or additional records from a third party, information stored or retrieved for this purpose alone cannot usually be used to identify you.
Marketing
The technical storage or access is required to create user profiles to send advertising, or to track the user on a website or across several websites for similar marketing purposes.