
sudo apt-get remove --purge x11-common
sudo apt-get autoremove
sudo apt-get update --allow-releaseinfo-changBlog
Install Telegraf for monitoring purposes
curl -fsSL https://repos.influxdata.com/influxdata-archive_compat.key -o /etc/apt/keyrings/influxdata-archive_compat.key
echo "deb [signed-by=/etc/apt/keyrings/influxdata-archive_compat.key] https://repos.influxdata.com/debian stable main" | tee /etc/apt/sources.list.d/influxdata.list
apt update
apt -y install telegraf
The telegraf configuration is located in /etc/telegraf/
Example configuration:
[global_tags]
[agent]
  interval = "60s"
  round_interval = true
  metric_batch_size = 1000
  metric_buffer_limit = 10000
  collection_jitter = "0s"
  flush_interval = "10s"
  flush_jitter = "0s"
  precision = ""
  hostname = "DB152"
  omit_hostname = false
[[outputs.influxdb]]
  urls = ["https://192.168.21.152:8086"]
  database = "Verhaeg_Monitoring"
  username = "xxx"
  password = "xxx"
  insecure_skip_verify = true
[[inputs.cpu]]
  percpu = true
  totalcpu = true
  collect_cpu_time = false
  report_active = false
[[inputs.disk]]
  ignore_fs = ["tmpfs", "devtmpfs", "devfs", "iso9660", "overlay", "aufs", "squashfs"]
[[inputs.mem]]
[[inputs.swap]]
[[inputs.net]]
  interfaces = ["ens18"]
[[inputs.netstat]]
[[inputs.kernel]]
[[inputs.system]]
[[inputs.processes]]
[[inputs.diskio]]
Disable Wifi and Bluetooth on Raspbery Pi
Edit the file /boot/config.txt and add the following lines to disable Wifi and Bluetooth:
dtoverlay=disable-wifi
dtoverlay=disable-btInstalling Eclipse Ditto
Download Ditto from Github and unzip it in your favorite directory:
cd /data/install
wget https://github.com/eclipse/ditto/archive/master.zip
unzip master.zip
Adjust the nginx password:
openssl passwd -quiet
 Password: <enter password>
 Verifying - Password: <enter password>
Append the printed hash in the nginx.httpasswd (in the same folder as docker-compose.yml) file placing the username who shall receive this password in front like this:
ditto:A6BgmB8IEtPTsConfigure the docker data directory in /etc/docker/deamon.json:
{
   "data-root": "/data/docker"
}
And finally, install Ditto using the Docker compose script:
cd ditto-master/deployment/docker/
docker-compose up -d
To automatically start Ditto at system start, and clean up the related log-files and the following two lines to crontab:
crontab -e

@reboot sleep 30 && cd /data/docker && find . -name "*json.log" -type f -delete
@reboot sleep 60 && cd /data/install/ditto-master/deployment/docker && sudo docker-compose up -d
Done!
Updating Eclipse Ditto
First, kill all docker containers. Then remove them, and remove their related images:
docker kill $(docker ps -q) && docker rm $(docker ps -a -q) && docker rmi $(docker images -q)Then we get the latest version of the docker-compose from GitHub:
wget https://github.com/eclipse/ditto/archive/refs/heads/master.zip
unzip master.zip
Unzip it, browse to the right directory, and start it:
cd master/deployment/docker
docker-compose up -d
Don’t forget to adjust the password:
openssl passwd -quiet
 Password: <enter password>
 Verifying - Password: <enter password>
Append the printed hash in the nginx.httpasswd (in the same folder as docker-compose.yml) file placing the username who shall receive this password in front like this:
ditto:A6BgmB8IEtPTsNo webinterface after connecting Shelly1PM to Wifi
When a Shelly (1PM) device boots in developer mode it shows its status and power usage in JSON. You can put the device into normal operational mode by sending the following HTTP command:
http://x.x.x.x/settings/developer?selftest_done=1Reboot the device and it’s webinterface should show up:
http://x.x.x.x/rebootConfigure a tagged and untagged interface on a Juniper SRX (100)
set interfaces fe-0/0/0 flexible-vlan-tagging
set interfaces fe-0/0/0 unit 0 vlan-id 20
set interfaces fe-0/0/0 unit 0 family ethernet-switching port-mode trunk
set interfaces fe-0/0/0 unit 0 family ethernet-switching vlan members tagged_vlan
set interfaces fe-0/0/0 unit 0 family ethernet-switching native-vlan-id 20Configuring Juniper SRX (100) as a DHCP server
Create a vlan interface:
set interfaces vlan unit 21 family inet address 192.168.x.2/24Assign the vlan interface to a vlan :
set vlans vlan_name vlan-id 21
set vlans vlan_name l3-interface vlan.21
Assign the vlan to a physical interface:
set interfaces fe-0/0/0 unit 0 family ethernet-switching vlan members vlan_nameAssign the dhcp-local-server service to the vlan interface:
set system services dhcp-local-server group IoT interface vlan.21Create the DHCP pool:
set access address-assignment pool Verhaeg_IoT family inet network 192.168.x.0/24
set access address-assignment pool Verhaeg_IoT family inet range r1 low 192.168.x.200
set access address-assignment pool Verhaeg_IoT family inet range r1 high 192.168.x.250
set access address-assignment pool Verhaeg_IoT family inet dhcp-attributes name-server 192.168.x.1
set access address-assignment pool Verhaeg_IoT family inet dhcp-attributes name-server 8.8.4.4
set access address-assignment pool Verhaeg_IoT family inet dhcp-attributes name-server 8.8.8.8
set access address-assignment pool Verhaeg_IoT family inet dhcp-attributes router 192.168.x.1
Don’t forget your security zone to allow dhcp traffic:
set security-zone x interfaces vlan.20 host-inbound-traffic system-services dhcpValidate clients have received an IP address from the DHCP server:
root@ROU-02> show dhcp server binding

IP address        Session Id  Hardware address   Expires     State      Interface
192.168.x.201    2           b6:54:ca:26:51:ae  70785       BOUND      vlan.21
192.168.x.202    3           c8:34:8e:5f:a4:2d  85932       BOUND      vlan.21
Determine washer program start-time based on predicted PV energy production.
When we decided we wanted to build a new house I wanted to invest in both passive and active technology to reduce our energy consumption as much as possible. My goal is to reduce our dependency from external energy sources, without installing batteries. This means I need to match our energy consumption with its (local) availability (or simply said: solar-powered production).
Use case
The washer, dishwasher, and dryer are energy-consuming devices. We are used to start these devices at night: the energy was cheaper, there was no noise pollution in the living room, and it made sense at the end of the day.
At the same time, it doesn’t really matter when these devices finish their work. Typically you want them finished within the next 12 hours or so. Therefore, a smart system could nicely plan their consumption based on the next available solar-power production peak, which typically happens around lunch-time anyway. This would increase the energy we consume directly from the solar panels and reduce the energy we need to consume from the grid.
To make things a bit easier I decided to buy devices that support the B/S/H Home Connect system. As we are still building the house I don’t have a dishwasher and at the moment we don’t use a dryer, so I started with the washer.
Challenges
I need a lot of information to make this work. Luckily there are some public (free-of-charge) cloud-services available that helped me a bit here and there. All of the selected services have well documented APIs that I could implement with ease. My biggest challenge was to get the OAuth 2.0 Device Authorization flow up and running for Home Connect.
- Appliance status to determine if there is a need to start a program.
- Solar-panel production prediction, at least 24 hours ahead.
- Solar-power production past, to validate quality of the prediction.
- Appliance program consumption pattern to match it against the prediction.
- Some user interface to notify me what is happening.
- [optional] Day-ahead energy pricing, in case the production is not sufficient to select an optimal (cost-efficient and grid-optimised) timeslot to consume energy from the grid.
In our current apartment I don’t have solar-panels. Therefore I’m using data from another (live) solar production site to simulate the behaviour of the concept.
System architecture
To manage expectations: I’m not a professional software engineer. I’m not planning to productise this, and just want to be able to maintain everything myself. I might publish some of the related projects on Github, but don’t expect a lot of documentation on it.
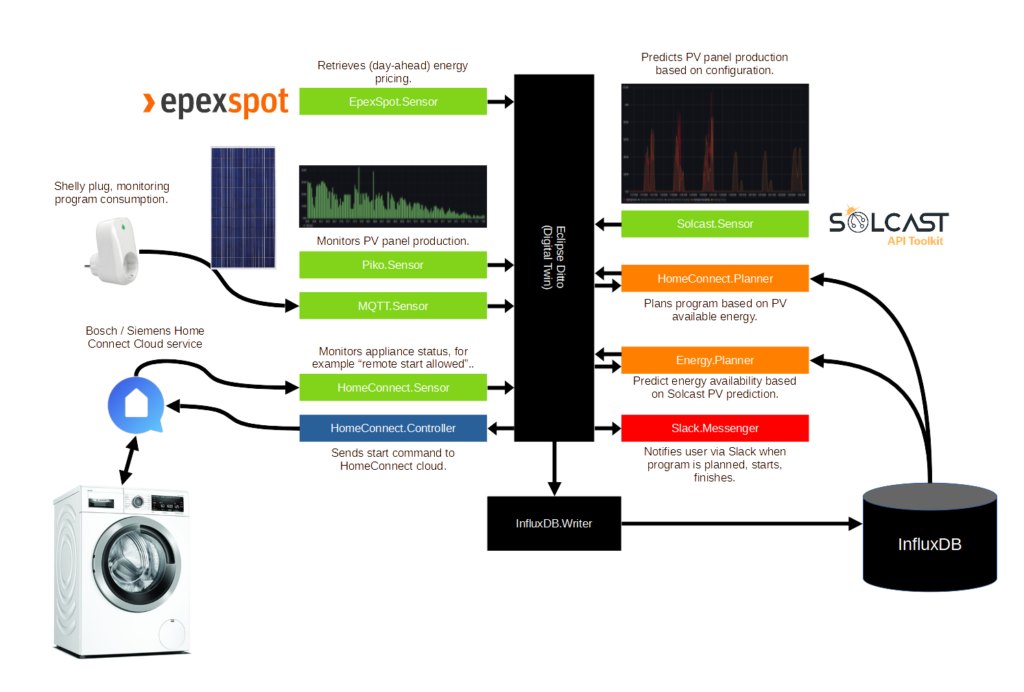
The image below shows a high-level system architecture. I’m using Ditto as a local digital twin for capturing the current state of all the entities in the system. Additionally, I’m using InfluxDB to store the historical states of the digital twins and Grafana to visualise the historical states. The green services are “sensors”: they retrieve data from their sources and update the digital twin. The blue services are “controllers”: they control the devices based on the status of the digital twin. The orange services are “processors”: they transform data or decide to start actions. The red services are “communicators”: they communicate with the user of the specific use-case.
How to use it?
Well, that’s the good news. Instead of pressing the “start” button on the washer, we press the “remote start enabled” (or “app”) button. The HomeConnect.Sensor captures this event and updates the digital twin. The HomeConnect.Planner is subscribed to this update and starts calculating the best possible timeslot in the next 16 hours to start the program. It considers the predicted solar-panel production, the history washer program consumption registered by the Shelly Plug, and the Epex spot pricing. Once it has calculated the ideal start time updates the “scheduledprogram” digital twin. The HomeConnect.Controller is subscribed on this update and sends the start command to the washer based on the time HomeConnect.Planner has defined. Slack (using Slack.Messenger) keeps the user up-to-date on what is happening, for example, when the program is planned, started, finished, or cancelled.
Installing and configuring Mosquitto on Debian

Eclipse Mosquitto is an open source (EPL/EDL licensed) message broker that implements the MQTT protocol versions 5.0, 3.1.1 and 3.1. Mosquitto is lightweight and is suitable for use on all devices from low power single board computers to full servers. The MQTT protocol provides a lightweight method of carrying out messaging using a publish/subscribe model. This makes it suitable for Internet of Things messaging such as with low power sensors or mobile devices such as phones, embedded computers or microcontrollers. The Mosquitto project also provides a C library for implementing MQTT clients, and the very popular mosquitto_pub and mosquitto_sub command line MQTT clients. Mosquitto is part of the Eclipse Foundation, is an iot.eclipse.org project and is sponsored by cedalo.com.
https://mosquitto.org/
Installation
wget http://repo.mosquitto.org/debian/mosquitto-repo.gpg.key
sudo apt-key add mosquitto-repo.gpg.key
cd /etc/apt/sources.list.d/
sudo wget http://repo.mosquitto.org/debian/mosquitto-buster.list
apt-get update
apt-get install mosquitto
Configuration
Create file /etc/mosquitto/conf.d/listener.conf:
bind_address x.x.x.xCreate file /etc/mosquitto/conf.d/authorisation.conf:
listener 1883 x.x.x.xCreate a user and password:
mosquitto_passwd -c <password file> <username>
kill -HUP <process id of mosquitto>
Result in /var/log/mosquitto/mosquitto.log:
1636747458: New connection from x.x.x.x:59620 on port 1883.
1636747458: New client connected from x.x.x.x:59620 as y (p2, c1, k60, u'client').
1636747843: New connection from x.x.x.x:5709 on port 1883.
1636747843: New client connected from x.x.x.x:5709 as z (p2, c0, k60, u'client').
Validation
